In the realm of crochet, granny squares hold a special place, captivating crafters with their vibrant colors, playful patterns, and endless versatility. These charming motifs have adorned blankets, bags, and even home décor, but their true potential lies in transforming into cozy and stylish garments. Embarking on the journey of crocheting a granny square cardigan is not merely a craft project; it’s an opportunity to express your creativity, personalize your style, and create a unique piece that reflects your personality.
This comprehensive guide will equip you with the knowledge and techniques necessary to crochet your own granny square cardigan, transforming simple squares into a wearable masterpiece. Whether you’re a seasoned crocheter or just starting out, these step-by-step instructions will empower you to bring your vision to life, stitch by stitch.
Materials and Supplies
Before diving into the world of granny square cardigans, it’s essential to gather the necessary tools and materials. Your primary weapon in this creative endeavor will be a crochet hook, typically made of metal, bamboo, or plastic. The choice of hook size is crucial, as it dictates the size of your granny squares and the overall gauge of your cardigan. The pattern you choose will specify the recommended hook size, based on the desired dimensions and yarn weight.
Next, you’ll need yarn, the very foundation of your crocheted creation. The type and weight of yarn you select will significantly impact the texture, drape, and overall aesthetic of your cardigan. Consider the desired style and the season when making your yarn choice. For instance, a lightweight cotton yarn might be ideal for a summer cardigan, while a chunky acrylic yarn could be perfect for a cozy winter garment.
To keep track of your progress and ensure accurate stitch placement, stitch markers are invaluable tools. These small, removable clips attach to your crochet hook and serve as visual reminders of important points in the pattern, such as where to begin shaping or adding decreases.
A pair of scissors will come in handy for snipping yarn ends and making adjustments as needed. A tapestry needle, with its fine, flexible point, is essential for weaving in loose ends, securing seams, and adding embellishments.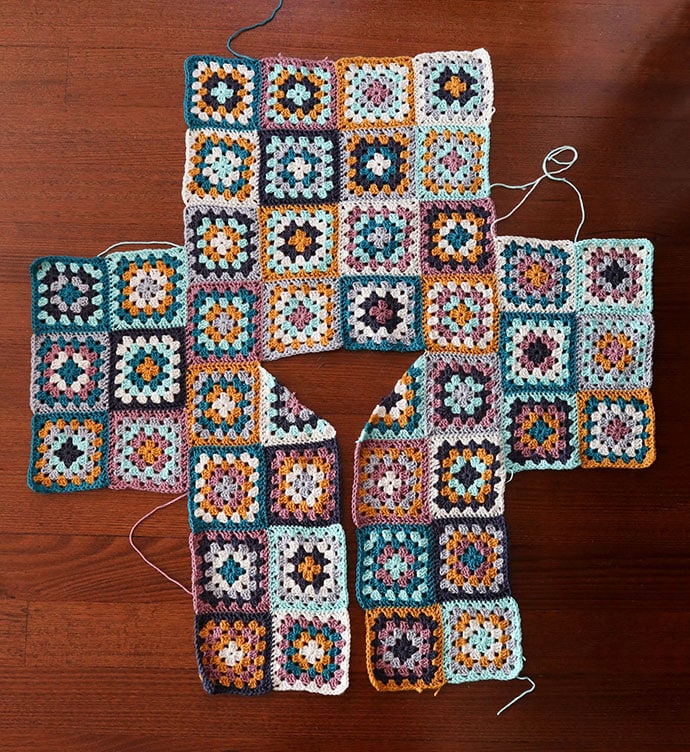
Choosing a Pattern
The world of crochet patterns offers a vast array of options, from simple beginner-friendly designs to intricate and challenging projects. As a novice crocheter, it’s advisable to select a pattern that aligns with your skill level and personal preferences. Consider your crocheting experience, the desired style of cardigan, and the amount of time you’re willing to invest in the project.
Numerous resources are available for finding crochet patterns, including books, websites, and online communities. Ravelry, for instance, is a popular online platform where crocheters can browse, share, and purchase patterns. When selecting a pattern, carefully review the instructions, ensuring they are clear and easy to follow. Pay attention to the pattern’s gauge requirements, yarn suggestions, and finished garment measurements.
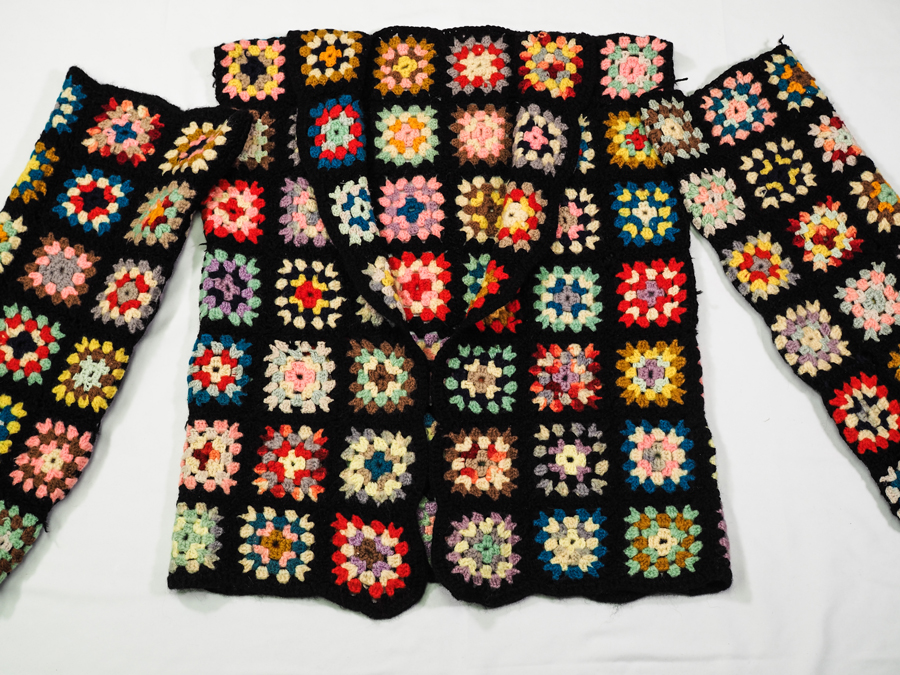
Creating Granny Squares
The foundation of your granny square cardigan lies in the individual granny squares themselves. These colorful motifs, often characterized by their unique color combinations and intricate patterns, form the building blocks of your garment.
To create a granny square, follow the specific instructions provided in your chosen pattern. The pattern will guide you through the process of crocheting rounds, incorporating various stitches, such as single crochets, double crochets, and chain stitches, to create the distinctive granny square design.
As you crochet each granny square, maintain consistent tension and ensure your stitches are evenly spaced. This will result in neat and uniform squares that come together seamlessly when assembling the cardigan.
Joining Granny Squares
Once you’ve crocheted a sufficient number of granny squares, it’s time to join them together to form the body and sleeves of your cardigan. The joining method will depend on the pattern you’ve chosen, but common techniques include using slip stitches or crocheting directly into the sides of the squares.
Carefully follow the pattern’s instructions for joining the squares, ensuring they are aligned correctly and that the seams are smooth and secure. This will create a cohesive and well-structured garment.
Shaping the Body and Sleeves
The body and sleeves of your cardigan require shaping to create the desired fit and silhouette. The pattern will provide specific instructions for shaping, typically involving increasing or decreasing stitches at strategic points.
For instance, the body panels might require shaping at the waist and hips to create a fitted look. The sleeves might involve decreasing stitches towards the cuffs to achieve a tapered shape.
Pay close attention to the pattern’s shaping instructions and follow them precisely to ensure your cardigan fits comfortably and flatters your figure.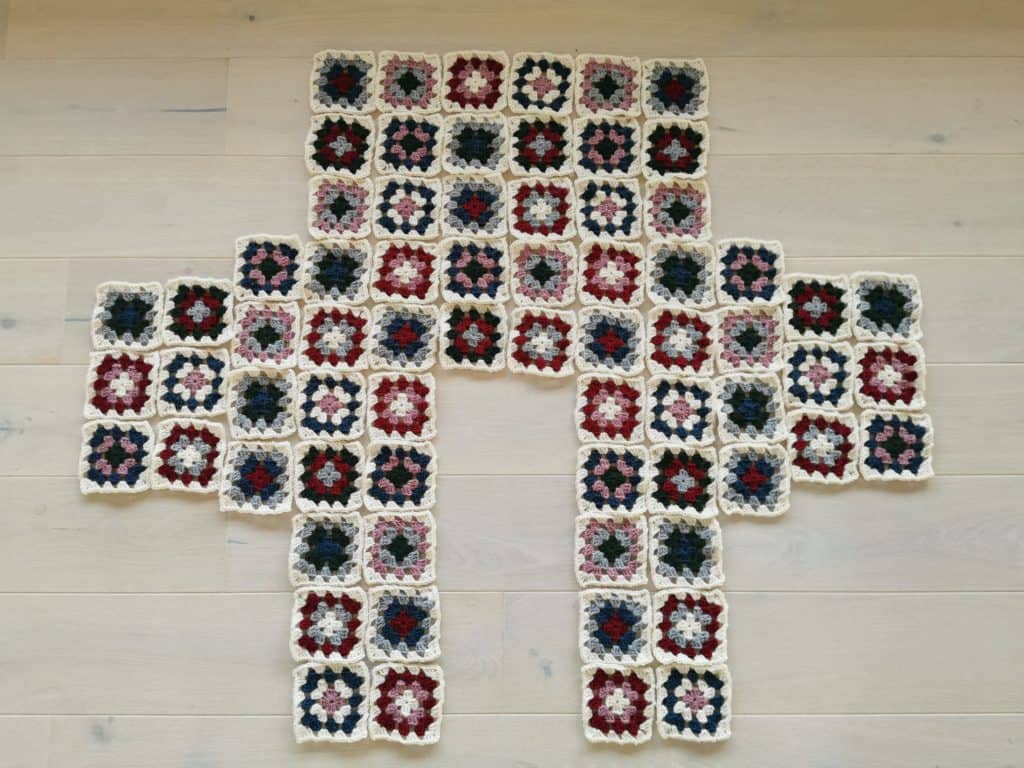
Adding Borders and Edgings
Borders and edgings add a decorative touch to your granny square cardigan, while also serving to reinforce the edges and prevent stretching. The pattern you’ve chosen will likely suggest specific border and edging options, but you can also experiment with different designs to personalize your creation. Common border and edging techniques include crocheting rows of single crochets or double crochets around the perimeter of the cardigan pieces. You can also incorporate more intricate designs, such as picots (small loops created by chaining stitches and then slipping back through them) or shell stitches (groups of double crochets separated by chain spaces), to add a unique touch.
Finishing Touches
Once you’ve completed crocheting all the pieces of your cardigan, it’s time to add the finishing touches that transform it from a collection of squares into a stylish garment. The first step involves weaving in all the loose ends of yarn. These ends are the tails left over from starting new squares, changing colors, or finishing off rows. Leaving them unwoven can create a sloppy appearance and potentially unravel your cardigan over time.
To weave in ends, thread a tapestry needle with the yarn end and use it to weave the end back and forth through several stitches on the wrong side of your crochet work. This secures the yarn end and prevents it from coming loose.
The next step, often referred to as blocking, involves washing and gently stretching the crocheted fabric to even out stitches and achieve the desired final dimensions for your cardigan. Blocking techniques vary depending on the yarn and fiber content, but generally involve soaking the garment in lukewarm water with a mild blocking solution, followed by pinning it out to dry on a flat surface.
Finally, you can personalize your cardigan by adding buttons or other embellishments. Buttons serve a functional purpose by securing the front closure of the cardigan, while also adding a decorative touch. Choose buttons that complement the overall style and color of your cardigan. You can also add other embellishments, such as pockets, embroidered designs, or decorative trims, to make your creation truly unique.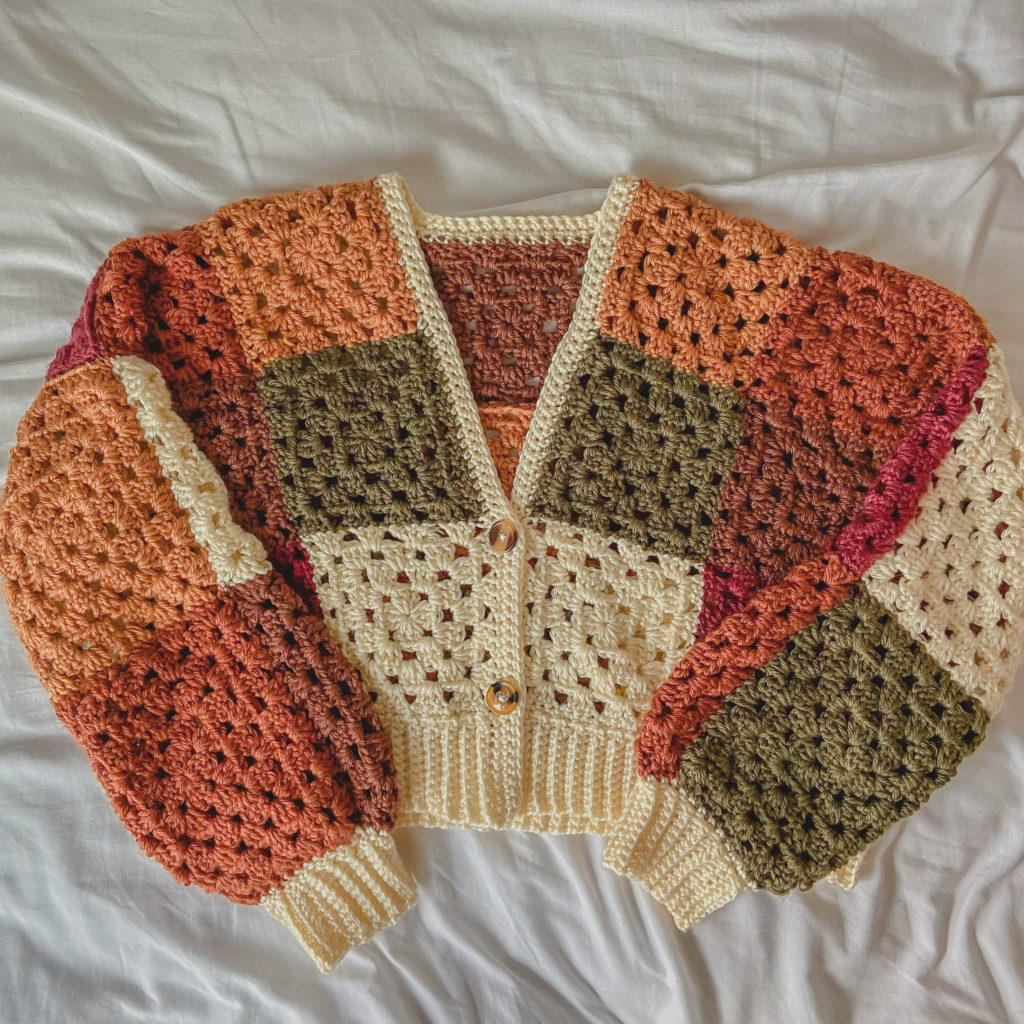
Caring for Your Granny Square Cardigan
With your beautiful granny square cardigan complete, you can now enjoy wearing your handcrafted creation! To ensure it retains its quality and appearance for years to come, proper care and maintenance are essential.
The specific care instructions will depend on the type of yarn you used. Always refer to the yarn label for washing recommendations. Generally, handwashing in lukewarm water with a gentle detergent is recommended for most crocheted garments. Avoid using harsh chemicals or bleach, as they can damage the fibers.
When drying your cardigan, never put it in a clothes dryer. Instead, lay it flat on a towel or drying rack in a well-ventilated area, away from direct sunlight or heat sources. The sunlight can fade the colors of your yarn, while heat can cause the fibers to shrink or lose their shape.
When storing your cardigan, fold it neatly and store it in a cool, dry place. Avoid hanging it on a hanger, as this can stretch out the shoulders over time. You can also store your cardigan in a garment bag to protect it from dust and moths.
By following these simple care tips, you can ensure that your granny square cardigan remains a cherished piece in your wardrobe for many seasons to come.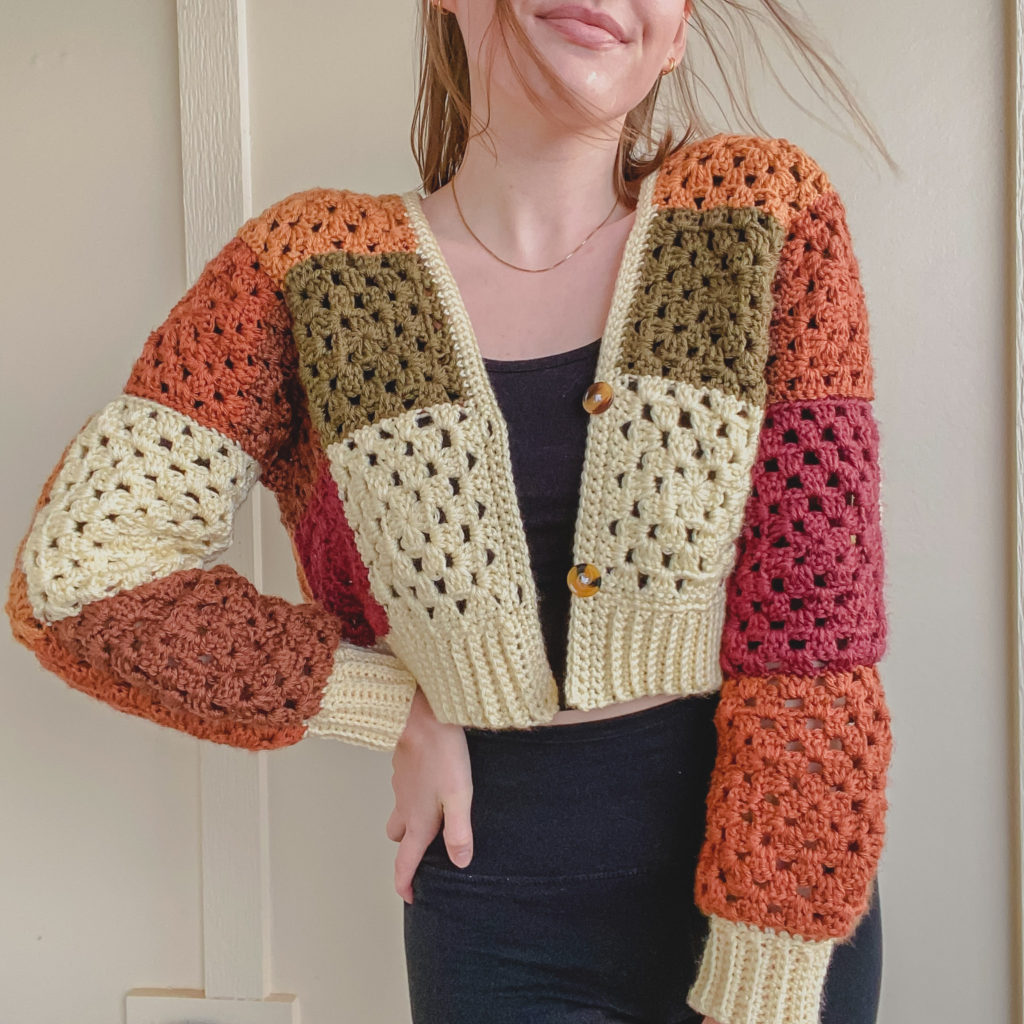
Conclusion
Crocheting a granny square cardigan is a rewarding journey that allows you to unleash your creativity and express your personal style. Throughout this guide, we’ve explored the essential steps involved, from selecting the perfect pattern and materials to creating granny squares, joining them together, shaping the body and sleeves, adding finishing touches, and caring for your completed garment.
Remember, crocheting is a skill that takes time and practice to master. Don’t be discouraged by any initial challenges; embrace the learning process and enjoy the satisfaction of creating something unique with your own hands. With dedication and a bit of creativity, you’ll be well on your way to crocheting beautiful and personalized granny square cardigans that will bring you warmth, comfort, and a profound sense of accomplishment.
So, gather your supplies, choose a pattern that inspires you, and get ready to transform colorful squares into a wearable masterpiece! The world of granny square cardigans awaits, ready to be explored with each stitch and filled with your unique creative vision.