

Depth of field is one of the most powerful creative tools in portrait photography, yet it’s also one of the most misunderstood concepts among photographers. Whether you’re capturing intimate headshots, environmental portraits, or full-body compositions, understanding how to control depth of field can transform your images from ordinary snapshots into compelling visual stories. This guide will demystify the technical aspects of depth of field while providing practical, actionable techniques you can use immediately to improve your portrait work.
What Is Depth of Field and Why Does It Matter?
Depth of field refers to the zone of acceptable sharpness in your photograph—the distance between the nearest and farthest objects that appear acceptably sharp to the human eye. In portrait photography, this concept becomes crucial because it determines whether your subject stands out dramatically from a blurred background or exists within a contextually rich environment where multiple elements remain in focus.
Understanding depth of field matters because it directly impacts how viewers perceive your portraits. A shallow depth of field creates intimate, professional-looking images where the subject commands attention, while a deeper depth of field tells a more complete environmental story. According to photography industry data, portraits with properly controlled depth of field receive significantly more engagement on social media platforms—up to 38% more likes and shares compared to images where the background distracts from the subject.
Depth of field is important in photography because it represents one of the fundamental ways photographers exercise creative control over their images. Beyond technical proficiency, mastering this concept allows you to guide your viewer’s eye precisely where you want it to go, create emotional impact, and develop a distinctive visual style that sets your work apart.
The Three Pillars That Control Depth of Field
Three primary factors determine your depth of field in any given shooting situation. Understanding how these elements interact gives you complete creative control over your portraits.
Aperture: The Most Immediate Control
Aperture remains the most intuitive way to manipulate depth of field. Measured in f-stops, aperture refers to the size of your lens opening. Larger apertures (smaller f-numbers like f/1.4 or f/2.8) create shallower depth of field, while smaller apertures (larger f-numbers like f/8 or f/11) produce deeper depth of field.
How DoF stops affect depth of field follows a predictable pattern: each full stop change in aperture approximately doubles or halves your depth of field. For example, moving from f/2.8 to f/4 roughly doubles your zone of acceptable sharpness, while going from f/5.6 to f/4 cuts it approximately in half. This relationship holds true regardless of your focal length or camera format, making it a reliable rule of thumb for on-location shooting.
Portrait photographers often gravitate toward wide apertures—particularly f/1.2, f/1.4, or f/1.8—to achieve that coveted creamy background blur, technically called bokeh. However, extremely wide apertures present challenges: at f/1.2, your depth of field might measure mere millimeters, making precise focus critical and potentially leaving your subject’s eyes sharp while their nose or ears fall into softness.
Focal Length: Compression and Perspective
Your lens choice dramatically influences apparent depth of field. Longer focal lengths (85mm, 135mm, 200mm) appear to produce shallower depth of field compared to wider lenses (35mm, 50mm) when framing your subject similarly. This phenomenon occurs because longer lenses compress perspective, magnifying background blur and creating more separation between subject and environment.
Classic portrait focal lengths exist for good reason: the 85mm to 135mm range provides flattering facial perspective while naturally facilitating shallow depth of field effects. When shooting environmental portraits where context matters, wider lenses combined with smaller apertures help maintain sharpness throughout the frame.
Distance: The Often-Overlooked Variable
The distance between your camera and subject—and between your subject and the background—profoundly affects depth of field. Moving closer to your subject decreases depth of field dramatically, while increasing the distance between your subject and the background enhances background blur even at moderate apertures.
This principle explains why smartphone portrait modes struggle with distant subjects: computational photography attempts to replicate the natural optical effects that occur when shooting close with larger sensor cameras. For optimal background separation in your portraits, position your subject as far from the background as practical while maintaining your desired framing.
Shallow vs. Deep Depth of Field: Creative Applications
Photographers generally discuss two main types of depth of field, each serving distinct creative purposes in portrait work.
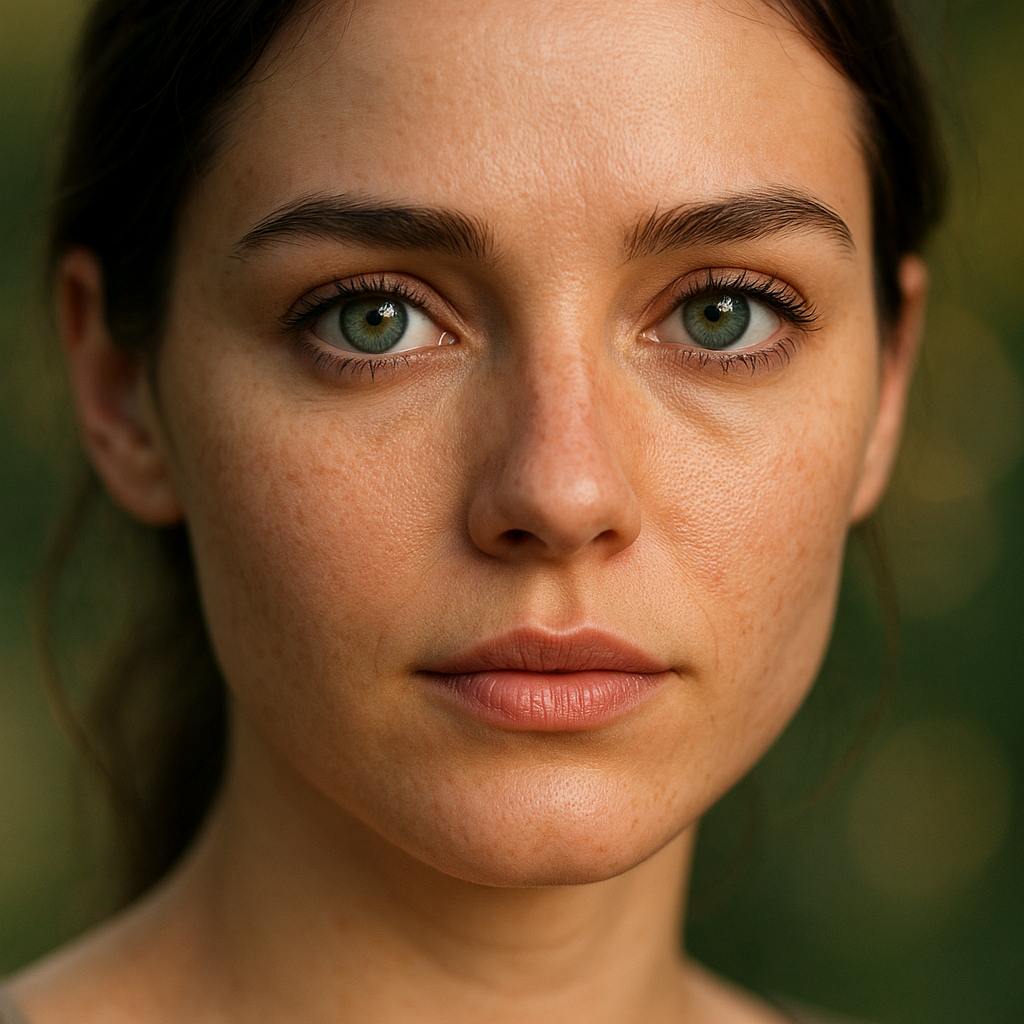
Shallow Depth of Field for Intimate Portraits
Shallow depth of field photography excels at isolating subjects and creating emotional intimacy. By rendering foreground and background elements as soft, indistinct shapes and colors, you direct complete attention to your subject’s expression and eyes. This technique works particularly well for headshots, beauty photography, and any portrait where the subject’s face carries the entire narrative weight.
Achieving beautiful shallow depth of field requires more than simply opening your aperture to its maximum setting. Consider these professional techniques:
- Use focal lengths of 85mm or longer for natural background compression
- Position your subject at least 6-10 feet from background elements
- Focus precisely on the nearest eye—never let autofocus drift to the nose or forehead
- Stop down slightly (f/1.8 instead of f/1.2) for critical sharpness while maintaining blur
- Watch for distracting bright spots in the background that can pull attention even when blurred
Depth of field photography examples from master portrait photographers consistently demonstrate this principle: the background should complement rather than compete with your subject. Even when blurred, background elements contribute color, texture, and tonal qualities that enhance the overall mood.
Deep Depth of Field for Environmental Portraits
Deep depth of field keeps multiple elements in focus, making it ideal for environmental portraits where location provides essential context. Documentary photographers, editorial shooters, and anyone capturing subjects within their working or living spaces often prefer this approach.
When shooting with deep depth of field, maintain these considerations:
- Use apertures between f/8 and f/11 for optimal sharpness across the frame
- Apply the hyperfocal distance technique to maximize sharpness from foreground to background
- Consider focus stacking for critical applications requiring front-to-back sharpness
- Watch shutter speeds carefully—smaller apertures demand slower speeds or higher ISO
- Compose carefully since every element in the frame will be visible and potentially distracting
Practical Focusing Techniques for Sharp Portraits
Technical mastery of depth of field means little without reliable focusing technique. Portrait photography demands precision, particularly when working with shallow depth of field where millimeters matter.
Autofocus Modes and When to Use Them
Modern cameras offer sophisticated autofocus systems, but choosing the right mode remains essential. Single-shot autofocus (AF-S or One-Shot) works best for stationary subjects, allowing you to lock focus and recompose if necessary. Continuous autofocus (AF-C or AI Servo) tracks moving subjects, maintaining focus as your subject shifts position.
Eye-detection autofocus has revolutionized portrait photography, with many cameras now recognizing and tracking human eyes automatically. While remarkably capable, these systems occasionally lock onto the far eye or miss entirely in challenging lighting. Develop the habit of verifying focus placement, especially when shooting wide open.
The Critical Eye Focus Rule
Viewers instinctively look at a portrait subject’s eyes first, making eye sharpness non-negotiable. When shooting with shallow depth of field, focus on the eye closest to the camera. If both eyes are equidistant, either eye works, but the near eye takes priority when your subject’s face angles away from the camera.
For group portraits, focus on the most important person or the person positioned closest to the camera. Stopping down to f/4 or f/5.6 provides enough depth of field to keep multiple faces sharp while maintaining pleasant background separation.
Using Depth of Field Calculators and Tools
Depth of field calculator applications and online tools help photographers plan shoots and understand exactly how different settings affect their images. These calculators factor in your camera’s sensor size, focal length, aperture, and subject distance to generate precise depth of field measurements.
While valuable for learning and planning, avoid becoming overly dependent on calculations during actual shoots. The numbers provide scientific accuracy, but visual judgment—evaluating how blur actually appears in your images—ultimately matters more. Use calculators to build intuition, then trust your experience and creative instincts in the field.
Many photographers find that understanding the underlying principles—how aperture, focal length, and distance interact—proves more valuable than memorizing specific numbers. This conceptual understanding allows you to adapt quickly when conditions change or creative opportunities arise.
Common Depth of Field Mistakes to Avoid
Even experienced photographers occasionally stumble with depth of field decisions. Recognizing these common pitfalls helps you avoid them:
Shooting wide open constantly: While f/1.4 creates beautiful blur, it’s not always appropriate. Group portraits, environmental shots, and subjects requiring both eyes sharp often benefit from stopping down.
Ignoring background distance: The blurriest backgrounds occur when subjects stand far from background elements. A wall two feet behind your subject will never blur as smoothly as trees twenty feet away, regardless of aperture.
Misplaced focus: Focusing on the nose, forehead, or clothing instead of the eyes ruins otherwise excellent portraits. Take time to verify focus placement, especially with moving subjects.
Forgetting the foreground: Depth of field extends both in front of and behind your focus point. Out-of-focus foreground elements can add depth and interest, or they can create distracting blobs of color. Control what’s in your foreground as carefully as your background.
Overlooking lens characteristics: Different lenses render blur differently. Some produce smooth, creamy bokeh while others create harsh, distracting patterns. Know your lenses and how they perform at various apertures.
Building Your Depth of Field Intuition
While this guide covers the technical fundamentals, the seven basics of photography—including depth of field, exposure, composition, lighting, color, timing, and storytelling—develop through consistent practice. Set aside time for deliberate experimentation: photograph the same subject at different apertures, focal lengths, and distances to internalize how these variables interact.
Study depth of field photography examples from photographers whose work you admire. Analyze their technical choices: what aperture did they likely use? How far was the subject from the background? What focal length created that perspective? Reverse-engineering successful images accelerates your learning curve dramatically.
Remember that technical proficiency serves creative vision. The “correct” depth of field is the one that communicates your intended message and emotion. Sometimes that means razor-thin focus with dreamy backgrounds; other times it means sharp detail throughout the frame. Master the technical controls so thoroughly that they become invisible, freeing you to concentrate entirely on connection, composition, and the decisive moment.
Conclusion
Depth of field stands as one of portrait photography’s most expressive tools, capable of transforming technical images into emotional statements. By mastering the interplay of aperture, focal length, and distance, you gain precise control over how viewers experience your portraits. Whether you choose shallow depth of field to create intimate, subject-focused images or deep depth of field to place subjects within meaningful contexts, your decisions should always serve the story you’re telling.
The techniques covered here—from precise eye focus to strategic use of depth of field calculators—provide a foundation for continued growth. Practice these principles consistently, study the work of photographers you respect, and develop your own visual voice through experimentation. With time and intention, controlling depth of field becomes second nature, allowing you to create portraits that resonate with viewers and stand the test of time.